Rosette Making – Part 3 of 3
Making a rosette: Part 3 of 3
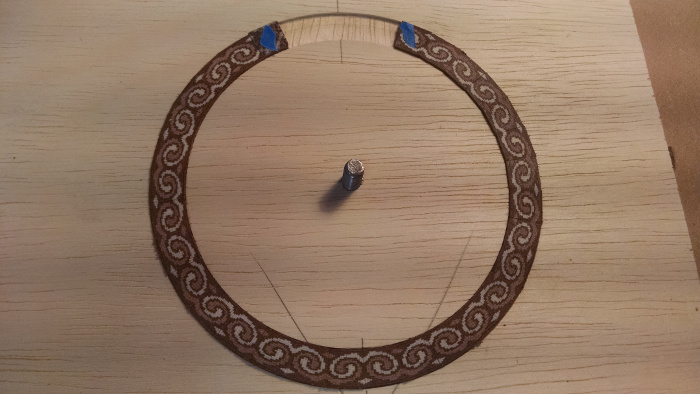
My last two blogs showed how to create the mosaic tiles that are used to create a rosette main field. This article shows how to turn this raw material into a pleasing rosette. Here is one of the completed rosettes that I will continue to work on in this article.

Part two ended with my creating a rosette tile log using epoxy to glue up the vertical columns of veneer. Each 3” long log turned out to be barely enough to create one rosette, so I made another full log using the same steps to complete a second rosette. But this time I use thinned white wood glue instead of epoxy to glue up the vertical slices and everything worked out fine. Wood glue turned out better in fact as I will show at the end of this article.
I also surface planed the inside and outside faces of the rosette logs and added another dark brown veneer on the outside edges of the pattern. I will need to route out part of the edges of these tiles to turn the straight faces into circular ring surfaces, so I wanted a bit more of the dark brown material to be able to remove and not get into the core pattern. Next mosaic logs I make will have 2 background veneer stripes on the top and bottom of the pattern so that this extra step will not be necessary.
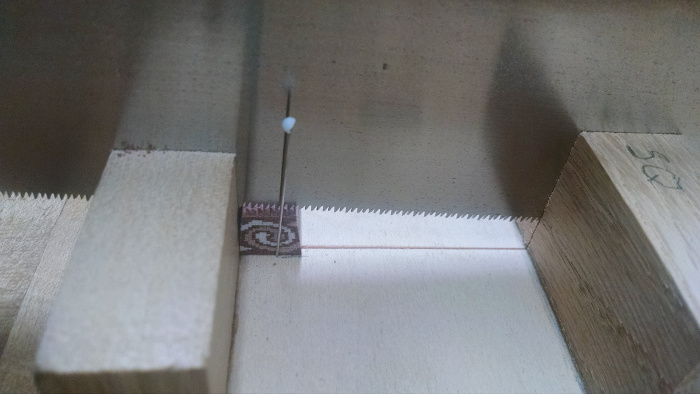
Once I had the logs completed, I needed to cross cut them to thickness. I aimed for 1.5 mm thick cross-sections of the rosette log, and cut these with a very fine toothed pull saw. I used a home-made miter jig that is sized to the kerf of my small pull saw. A straight pin was used as a stop so that every piece could be pressed up against the pin and chopped off so that all cutoffs had the same thickness. Here’s the view of a piece about to be cut off:
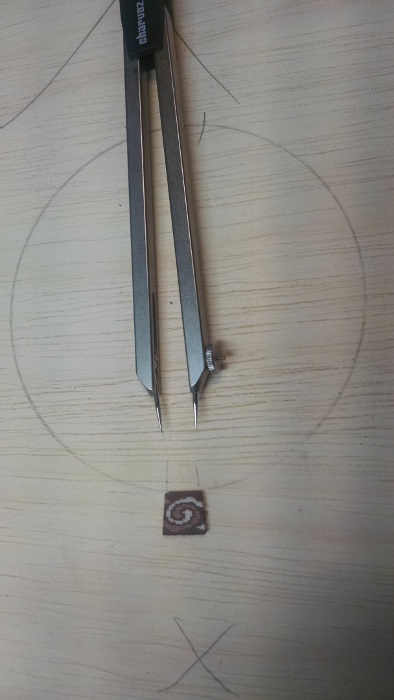
A circle of tiles is then laid out on scrap wood, and measured to see exactly how many tiles will be needed to create most of a circle. A gap at the top is acceptable because the fingerboard will cover that area. Dividers are used to march the width of the tile around the inside diameter. It turns out I need 30 tiles per rosette.
Straight off the saw, you can see that there are some rough edges and gaps between the edges of the tiles. These were straightened up with a sandpaper block square to the edge of my workboard so that the edges are cleaned up. Sorry, I forgot to take take a picture of that operation. A couple of swipes with 320g sandpaper at a 90 degree edge is all that’s required.
I then routed a ring into some scrap plywood and fit the tiles into this ring. This was to determine the ring size needed on the real soundboards, as well as to make sure the edges are all clean and invisible between tiles before they are glued into a real soundboard.
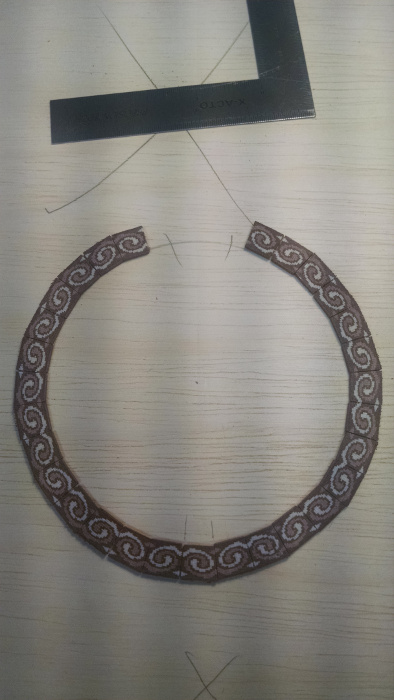
All the pretty pieces falling together. The two pieces in the image below marked with blue tape were the rough ends of the initial log. I got exactly 30 slices off each log which is exactly what was needed to complete this rosette. In the future, I’ll make the logs 3.5” long so I can cut off the ragged bits at the end of the log. These ugly end pieces will be mostly contained under the fingerboard, so I can live with some gaps in the pattern on those two pieces. The blue tape was primarily as a reminder to myself so that those pieces did not wind up in a more visible location.
Time to break out the real soundboard (Western Red Cedar in this example) and route the ring slot for these tiles. Before any routing occurs, I sand the entire top surface clean with 150g, and then progress through 180g and 220g sandpaper to remove any scratches. Then the top is coated with a couple thin coats of shellac to help hold the fibers together. I get less tearout on the top from routing the softwood when it has this shellac protective layer. A fresh and sharp bit also helps with that. The shellac layer also prevents glue from soaking into the top which is important as I want enough glue in there to get a good hold on the pieces, and some is bound to get out. The shellac also provides a very visual indication when leveling the final rosette when you get down to the top and the finish starts disappearing.
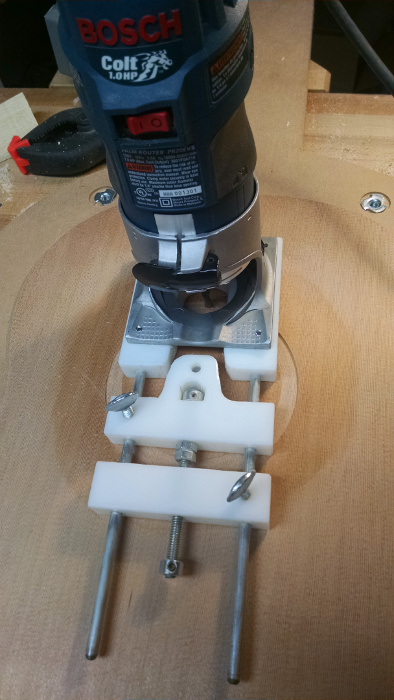
Here’s the nifty router jig I made for creating rosette rings. The adjustment screw for diameter runs through the center of the jig (bottom of picture), and is a ¼-20 thread. Each turn of this screw adjusts the diameter of the ring by 0.050”. The vertical hole in the central Ultra High Molecular Weight (UHMW) plastic piece rotates on a ¼-20 rod protruding through a ¼” hole in the center of the soundhole location on the soundboard. Gross changes in diameter are made by loosening the outer most thumb screw (bottom right in picture) and moving the two outer sliding components together. Then that thumb screw is locked down, and find adjustments are made using the threaded rod. When the correct location is found, the thumb screw in the middle component (left middle of picture) is clamped down. This was based upon a jig idea I found a few years ago in a youtube video that I can no longer find, so sorry I don’t have the link.
I route the initial slot in the center of my desired rosette tile area, measure the inside diameter of that slot, and then move the router in by the amount needed to get desired inside diameter of the final slot. Knowing one turn is 0.050” makes this calculation easy. Then the same calculation is made for the outer diameter. Slot is 1mm deep so that the 1.5mm tiles will protrude.
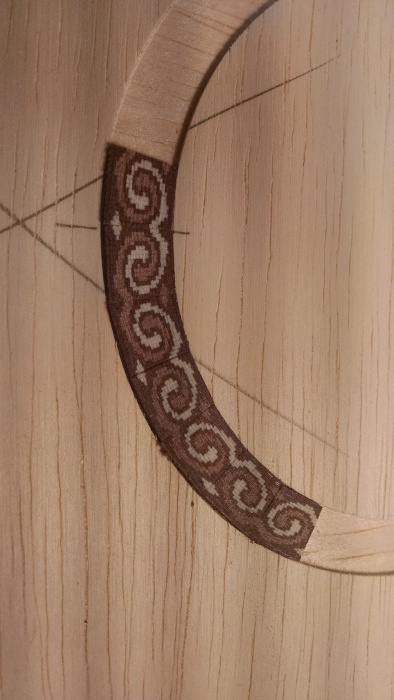
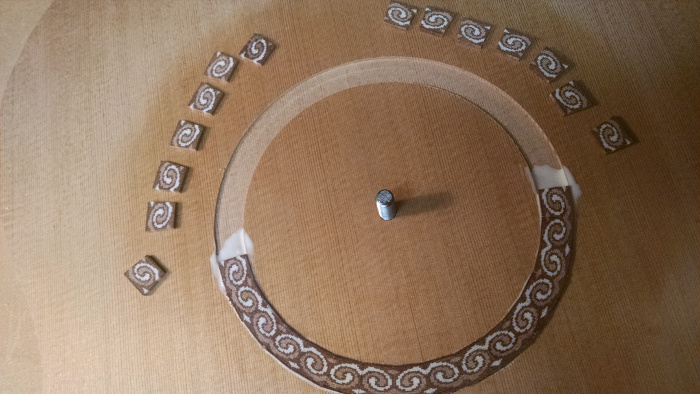
I start assembling tiles at the lower edge of the soundhole at the center line of the top, where the bookmatched top halves are joined. I chose to make the rosette pattern have the white diamond center line up with the centerline of the top. Lay out all of your pre-jointed tiles in the correct order around the slot first so you are not guessing where everything is going during glue up. Use a good amount of titebond glue to keep everything wet while you are working. I put in a few tiles each side and then moved to the other side so I could jump back and forth to keep all the glue surfaces wet. Total assembly time was about 2 minutes since you want to work fast to avoid the glue setting. I did risk stopping to take a picture half-way through:
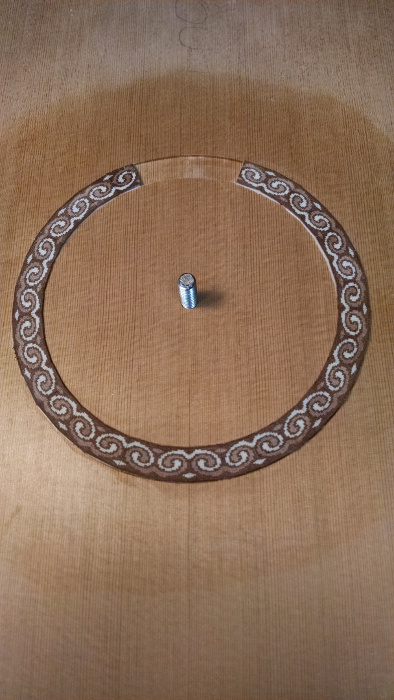
And here is the completed ring of glued in tiles. The remaining gap at the top will be filled in later. You can see there is a bit of glue that got on the top which is OK since we used the shellac protection layer.
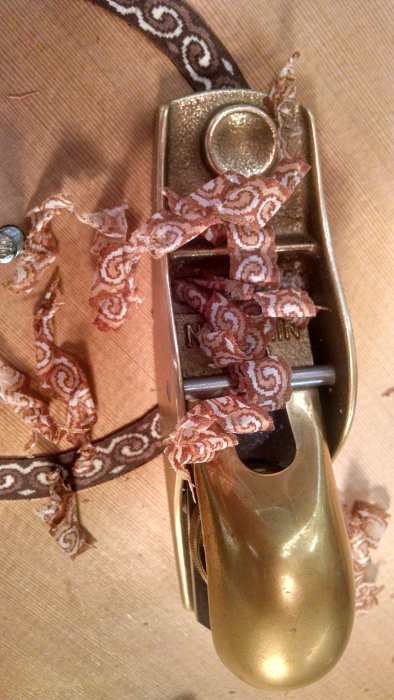
After the glue is dried, the mosaic tiles are leveled with a freshly sharpened hand plane. I leave them slightly proud of the soundboard as there will be another leveling step occurring later. The goal here is to make the surface all the same height so that the router can again be used to route the slots for the edge banding.
I sliced off thin sticks of veneer using the same woods as used in the rosette tiles. It seemed a bit plain with just brown, tan and white. I added some red into the mix as well to brighten it up. The color scheme I chose was to have the following sequence moving from the rosette tiles out towards the soundboard… white-red-white-brown-brown-tan-brown-brown. The red seemed to be needed to keep the overall scheme from being too bland, and should pop out once the entire top is finished with shellac. I decided not to attempt wheat banding or any other diagonal veneers in the banding region as this is my first mosaic rosette and I didn’t want to tackle too many new things all at once.
Each veneer stick first had one long edge jointed using a hand plane, and then sawn off the sheet of veneer stock using a veneer saw. This resulted in every stick having one good square edge. This edge will be glued down into the rosette so that a void won’t accidentally pop out later during leveling of the rings.
Using the above router jig, I routed out inner and outer banding ring slots to 1.5mm deep (deeper than the rosette tiles). It takes a bit of effort to bend these veneers around the circle, so I wanted to make sure there is enough depth in the slot to hold the veneer rings in so that they can be bent while gluing. I again routed in the middle of the slot, then carefully advanced the bit towards the rosette tiles until all the square edges were routed to be curved, and then expanded the slot in the other direction (away from the tiles) to the desired overall width. Below is the necessary dry-fit to make sure the ring slot width is adequate for all these veneers.

The blue tape shown here is a sliding tube to hold the bundle together. I wrapped blue tape sticky side out tightly around the bundle, and then covered this with another piece of tape sticky side in. This keeps the bundle tightly together while you are pressing the veneer into the slot and can easily slide lengthwise along the bundle as you progress. I put a couple of these on each bundle to keep them well dressed together during gluing. You don’t want to be panicking about tangled veneers while glue is setting.
To glue these in, a copious amount of titebond is used inside the slot. The veneers will get lots of super glue later, so they just need to stay attached to the sound board for now. The veneers fit in nicely if you bend the bundle around the inside edge of the circle and then slide the outside edge into the remaining gap.
Once both banding rings are inlaid and dried, another leveling is performed. A plane takes all of the rosette down to just above the soundboard. Stop just before you get to the shellac finish, as you want to flood the entire rosette at this time with super glue. You want shellac on the top to be able to mop up any spills since super glue is extremely runny. One entire small tube per rosette is just about right. This holds everything together for keeps, and fills any gaps with clear glue.
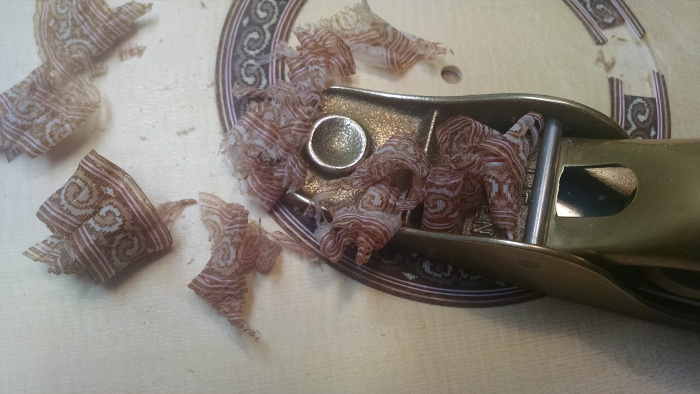
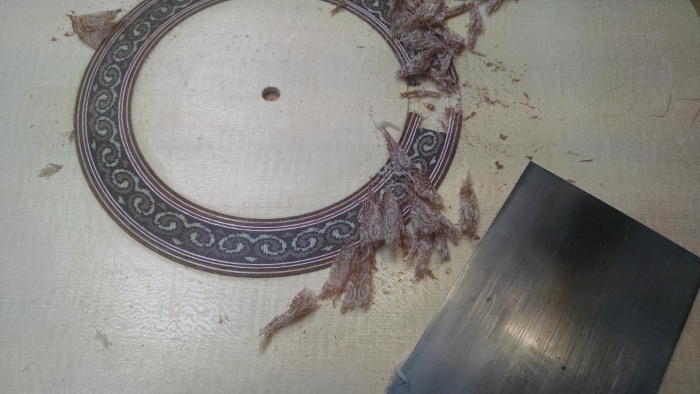
After the super glue is completely dried, a bit more work to level the rosette with the plane. Once you start hitting the shellac finish, move to a scraper for finer stock removal. The scraper requires care because one misplaced scrape with a corner of the tool could cause some significant damage. Just use the flat edge in the middle. You can see the scraper makes much finer shavings.
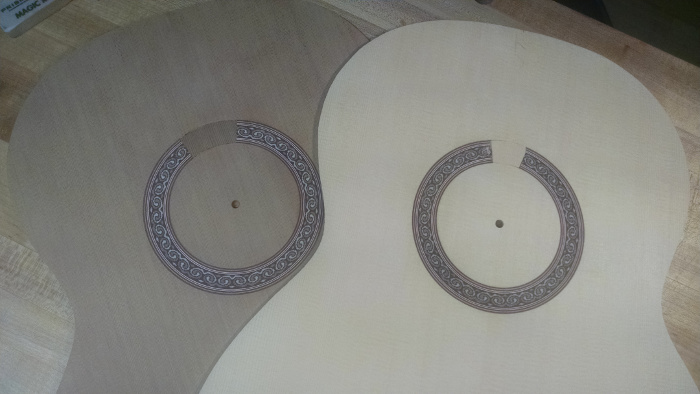
And here are two examples of the final rosette after a good level sanding using a hard backing block. The left soundboard is cedar and the right soundboad is Engleman spruce. The gaps that will be under the fingerboard have been patched with chunks of similar wood so that there are no resonant gaps or gluing surface voids under the fingerboard.
Footnote on gluing:
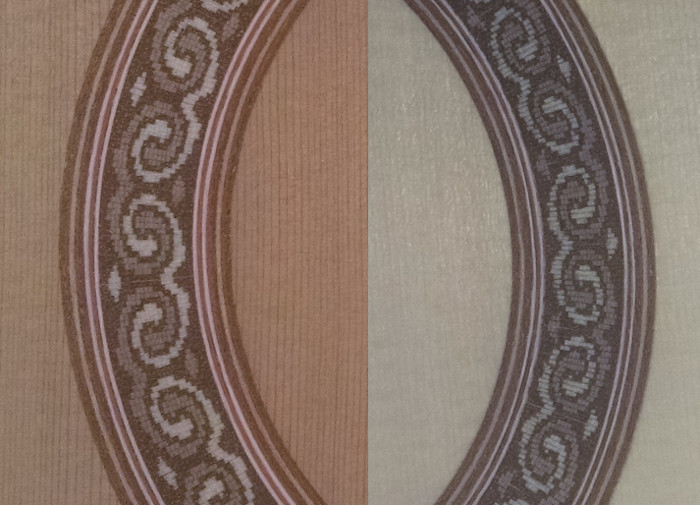
At the top of this blog, I mentioned the different glues used to create the two logs for the rosette field. The difference is apparent on the composite close-up of sections of these two rosettes below. On the spruce top, the log I used had epoxy as the glue between the radial slices of the rosette. On the cedar top, the log used thinned white glue between the radial slices. You can clearly see some dark radial lines between the white elements of the rosette on the spruce top on the right. Compared to the left of this picture where the white sections of the rosette on the cedar top seem to blend together. I prefer the blended look of the white glue used in this process over the epoxy, and I’ll use that from now on. The only reason I used epoxy in the first place was fear that my laminated columns would delaminate with further exposure to water in the thinned white glue. That fear has now been eliminated.
You can also see there is some misalignment in one column of the pattern of tiny wood pixels on the spruce top. That is the first one I made and the tiles used on the cedar top have less misalignment. So I’m already improving pattern alignment between rosette #1 and #2!
Thank you so much for following along. I’ve learned a lot along this path of discovery, and hope that I’ve helped you learn something too. If you have any comments on any steps of the process, please do let me know. This is by no means the best or only way of doing this, it’s just the method that my meandering thought process and minimal research has stumbled upon.
And please do remember the number of steps in this process before you make that “nice sticker” comment to the next luthier you see while pointing to his rosette. Be kind to your poor luthier. A lot of work goes into one of these!
Paul Micheletti
Beautiful work Paul. Very elegant design
Thank you Len!